
 Portal
The Ringlight Tutorial. uber cheap
Page 1 of 1

The Ringlight Tutorial. uber cheap
![]() by SidiA Mon Feb 08, 2010 6:19 pm
by SidiA Mon Feb 08, 2010 6:19 pm
The Ringlight Tutorial. uber cheap
Sam | www.samuelpotter.com says:
UPDATE: There's now 2 ringlights in this tutorial, the first being an on-camera hotshoe ringlight; the second is designed more for wireless triggering(and is twice as big).
Materials:
1. Cardboard you took from the grocery store dumpster
2. Duct Tape
3. Aluminum Foil
4. Glue (i used a glue stick)
4. 7-8 inch diameter plate or round object
6. Serrated (steak) knife to cut the cardboard holes. (scissors work for cutting the big stuff
7. Sandpaper (optional) -good for smoothing the holes you cut.
I'm likely going to give lots of small details that aren't necessary to many of you, but I'm the kind of person who takes any part of information I can get from tutorials. If you can do things on your own by just looking at the pictures, just ignore that small details. Also, I've only been in doing photography for 4 months, so i may not have all the correct lingo, so please bear with me!
Like I said in my previous post: www.flickr.com/groups/strobist/discuss/72157603453570041/
This probably isn't the best design, but what I like about it is it's easy to make and doesn't require the flash to be mounted under the camera. What I did is combined a couple designs other people made: lactose.blogspot.com/2007/11/ring-flash.html
and
www.flickr.com/photos/21017948@N06/2044088185/in/photostr...
Make sure you have your supplies and sufficient food and water to keep the stress level at a minmum during the construction!

lets get started.
Portion #1 - Hot Shoe Portion
-First thing I did was measure each side of my 580EX(the Top Flash part) by laying it down on a piece of cardboard and tracing the corners of it. Im not that great at just dealing with numbers so i usually do all the measuring by tracing the actual object. Make sure the side pieces and top piece are longer(as pictured below) because the top will later be bent to 45 degrees to send the light down, and the side pieces need to be longer for connecting the other portion of the ringlight later. -After tracing out each piece I then glue aluminum foil to whats going to be the inside part of this section. There's usually a dull and shiny side to foil, be sure to have the shiny side showing to get the most reflection.
-Now you're ready to put the sides together with duct tape. I layed my hotshoe on the cardboard and formed all the sides to the size of the flash as you can see pictured below.

Portion #2: The Backside
-First you want to make the back side. take a flat piece of cardboard and lay your camera with the Hot Shoe attached faced down on it. Draw a line tracing the top of the hot shoe, and also trace a ring around your lens so you have an idea of where your lens will be coming through. then you can remake the circle larger to accommodate your largest lens, in my case a 87mm diameter 12-24 sigma.
-then take your plate or round object and draw a circle around the lens circle you made, keeping the space between where your lens is and the bottom the smallest. this chokes the light to be stronger at the bottom where there usually is the most light loss in other ringlights. this is explained in this tutorial i mentioned above: lactose.blogspot.com/2007/11/ring-flash.html however I failed to properly follow this tutorial because I didn't make the sides wide enough to really disperse the light perfectly like that guy does in the tutorial. so if i were to do it again I'd make the sides wider.
-draw lines from the top to the sides of the circle.
Heres a picture of these steps together:

Sam | www.samuelpotter.com says:
UPDATE: There's now 2 ringlights in this tutorial, the first being an on-camera hotshoe ringlight; the second is designed more for wireless triggering(and is twice as big).
Materials:
1. Cardboard you took from the grocery store dumpster
2. Duct Tape
3. Aluminum Foil
4. Glue (i used a glue stick)
4. 7-8 inch diameter plate or round object
6. Serrated (steak) knife to cut the cardboard holes. (scissors work for cutting the big stuff
7. Sandpaper (optional) -good for smoothing the holes you cut.
I'm likely going to give lots of small details that aren't necessary to many of you, but I'm the kind of person who takes any part of information I can get from tutorials. If you can do things on your own by just looking at the pictures, just ignore that small details. Also, I've only been in doing photography for 4 months, so i may not have all the correct lingo, so please bear with me!
Like I said in my previous post: www.flickr.com/groups/strobist/discuss/72157603453570041/
This probably isn't the best design, but what I like about it is it's easy to make and doesn't require the flash to be mounted under the camera. What I did is combined a couple designs other people made: lactose.blogspot.com/2007/11/ring-flash.html
and
www.flickr.com/photos/21017948@N06/2044088185/in/photostr...
Make sure you have your supplies and sufficient food and water to keep the stress level at a minmum during the construction!
lets get started.
Portion #1 - Hot Shoe Portion
-First thing I did was measure each side of my 580EX(the Top Flash part) by laying it down on a piece of cardboard and tracing the corners of it. Im not that great at just dealing with numbers so i usually do all the measuring by tracing the actual object. Make sure the side pieces and top piece are longer(as pictured below) because the top will later be bent to 45 degrees to send the light down, and the side pieces need to be longer for connecting the other portion of the ringlight later. -After tracing out each piece I then glue aluminum foil to whats going to be the inside part of this section. There's usually a dull and shiny side to foil, be sure to have the shiny side showing to get the most reflection.
-Now you're ready to put the sides together with duct tape. I layed my hotshoe on the cardboard and formed all the sides to the size of the flash as you can see pictured below.
Portion #2: The Backside
-First you want to make the back side. take a flat piece of cardboard and lay your camera with the Hot Shoe attached faced down on it. Draw a line tracing the top of the hot shoe, and also trace a ring around your lens so you have an idea of where your lens will be coming through. then you can remake the circle larger to accommodate your largest lens, in my case a 87mm diameter 12-24 sigma.
-then take your plate or round object and draw a circle around the lens circle you made, keeping the space between where your lens is and the bottom the smallest. this chokes the light to be stronger at the bottom where there usually is the most light loss in other ringlights. this is explained in this tutorial i mentioned above: lactose.blogspot.com/2007/11/ring-flash.html however I failed to properly follow this tutorial because I didn't make the sides wide enough to really disperse the light perfectly like that guy does in the tutorial. so if i were to do it again I'd make the sides wider.
-draw lines from the top to the sides of the circle.
Heres a picture of these steps together:

SidiA- Kawan Masam..Sansen Gila..
-
 Posts : 2719
Reputation : 18 -

Re: The Ringlight Tutorial. uber cheap
![]() by SidiA Mon Feb 08, 2010 6:23 pm
by SidiA Mon Feb 08, 2010 6:23 pm
Portion(s) #3 - The Center Circle and Outer Edge
-Now you need the center Circle Piece and the outer edge. I used the same size as the the side of the Hot Shoe to make everything the same depth. It'd probably be best to first cut out the center(where the lens goes through) so you don't have to eye it later (Like I did) after the foil is put down. a small serrated(steak) knife worked great for me for cutting the circle.
-I First put on the outer edge with duct tape. to make the outer edge I used a few pieces combined, but you could easily just make one long piece if you have enough cardboard. After putting the outer edge on, Foil the entire inside well and make sure you give it a sec to dry. -If you didn't already cut out the center hole, place your circle piece(which also has foil on it) where you think it should go, then tape it to the sides temporarily so you can trace THE INSIDE of the circle where you will be cutting it out. the reason you trace the inside is so the circle piece comfortably sits on the back piece, and doesn't go right through the hole. this is what the piece looks like before I cut it:

Portion #4: The Front Piece
-lay the back piece on a piece of cardboard, trace the outside, but also include an extra lip at the bottom that will be used to attach to the Hot Shoe Portion. cut it out. also be sure to trace where the lens hole is, just so you know where it is, but dont cut it out yet. im sure theres a better way to do this, but i made a mark a tad above the very bottom of the circle (where the light is choked) and measured from that mark to the center hole. I cant remember the dimension, probably an inch-inch and a half. basically make the measurement however thick of a ring you want. I then took that measurement and made a mark from the center hole circle to the outside probably 30 times all the way around the center hole so i could draw a nice even circle all the way around it by connecting the dots.
-now you can cut a hole out of the front piece from the circle you just "connected the dots" on.

-Now foil the side that will be on the inside. you can see the foiled, cut piece pictured below in the top left.

PUTTING THE FRONT, BACK AND HOT SHOE PORTIONS TOGETHER:
-first tape the front piece on the back piece with duct tape. (pictured bottom right)

-Then put the 45 degree angle side of the Hot Shoe Portion on the Piece you just combined and duct tape it together.


--Optional Additions/Mods--
-You can put a thick rubber band where it attaches to the hot shoe to help it stay on.
-Use one or multiple plastic bags as a diffuser to put over the ring.
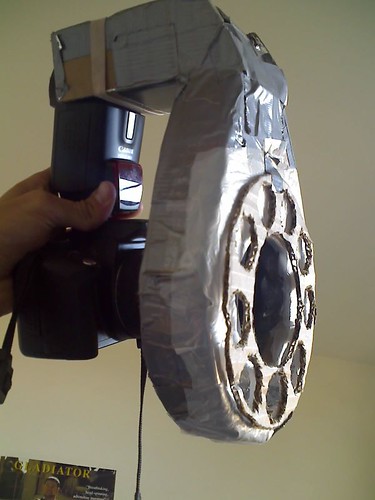
-Cut out another cardboard piece, as pictured above, with holes to make your ring look sexy.
YOUR DONE!!!
pat yourself on the back, make some more mac n cheese, eat ice cream, experiment on random objects in the room, set the camera on a tripod and take pictures of yourself for an hour or two (not saying I did that or anything.....)
-Now you need the center Circle Piece and the outer edge. I used the same size as the the side of the Hot Shoe to make everything the same depth. It'd probably be best to first cut out the center(where the lens goes through) so you don't have to eye it later (Like I did) after the foil is put down. a small serrated(steak) knife worked great for me for cutting the circle.
-I First put on the outer edge with duct tape. to make the outer edge I used a few pieces combined, but you could easily just make one long piece if you have enough cardboard. After putting the outer edge on, Foil the entire inside well and make sure you give it a sec to dry. -If you didn't already cut out the center hole, place your circle piece(which also has foil on it) where you think it should go, then tape it to the sides temporarily so you can trace THE INSIDE of the circle where you will be cutting it out. the reason you trace the inside is so the circle piece comfortably sits on the back piece, and doesn't go right through the hole. this is what the piece looks like before I cut it:
Portion #4: The Front Piece
-lay the back piece on a piece of cardboard, trace the outside, but also include an extra lip at the bottom that will be used to attach to the Hot Shoe Portion. cut it out. also be sure to trace where the lens hole is, just so you know where it is, but dont cut it out yet. im sure theres a better way to do this, but i made a mark a tad above the very bottom of the circle (where the light is choked) and measured from that mark to the center hole. I cant remember the dimension, probably an inch-inch and a half. basically make the measurement however thick of a ring you want. I then took that measurement and made a mark from the center hole circle to the outside probably 30 times all the way around the center hole so i could draw a nice even circle all the way around it by connecting the dots.
-now you can cut a hole out of the front piece from the circle you just "connected the dots" on.
-Now foil the side that will be on the inside. you can see the foiled, cut piece pictured below in the top left.
PUTTING THE FRONT, BACK AND HOT SHOE PORTIONS TOGETHER:
-first tape the front piece on the back piece with duct tape. (pictured bottom right)
-Then put the 45 degree angle side of the Hot Shoe Portion on the Piece you just combined and duct tape it together.
--Optional Additions/Mods--
-You can put a thick rubber band where it attaches to the hot shoe to help it stay on.
-Use one or multiple plastic bags as a diffuser to put over the ring.
-Cut out another cardboard piece, as pictured above, with holes to make your ring look sexy.
YOUR DONE!!!
pat yourself on the back, make some more mac n cheese, eat ice cream, experiment on random objects in the room, set the camera on a tripod and take pictures of yourself for an hour or two (not saying I did that or anything.....)
SidiA- Kawan Masam..Sansen Gila..
- Posts : 2719
Reputation : 18 -
Re: The Ringlight Tutorial. uber cheap
![]() by SidiA Mon Feb 08, 2010 6:27 pm
by SidiA Mon Feb 08, 2010 6:27 pm
 16mm
16mm 37mm
37mm 18mm
18mm 50mm
50mm 50 mm
50 mm 12 mm
12 mmIf you want to get the ring-in-the-eyes look then you should shoot in lower mm, unless you have a macro zoom. the closer to the camera you get the bigger the ring in your eye is. the further you get from the camera you lose the ring but still have nice diffused lighting!
I hope this tutorial helped. If you have any questions please ask. enjoy the ringlight, God bless
Last edited by SidiA on Mon Feb 08, 2010 6:31 pm; edited 1 time in total
SidiA- Kawan Masam..Sansen Gila..
- Posts : 2719
Reputation : 18 -
Re: The Ringlight Tutorial. uber cheap
![]() by SidiA Mon Feb 08, 2010 6:29 pm
by SidiA Mon Feb 08, 2010 6:29 pm
UPDATE 1/14/08: Uber Cheap Ringlight 2.0 - Wireless Trigger Happy
Here's the only photo I have of the ringlight before I closed it up. ignore the tupperware in the middle(the idea behind that was to use this same flash as a beauty dish too), and it also needs the extra cardboard ring in the center that the lens goes through.
The MAIN thing you should notice is that the edges have a curve to them made w/ the foil tape, to help reflect the light out. but there is no curve on the center hole that the lens goes thru, so more light can slip by and get to the back. (hope that makes sense)

NOW Here's a closed up shot. The MAIN thing with this is to notice there is a V shape in the center hole to help send the light down the sides. i'll give dimensions later. pardon the poor pics it's 1:25am.


Here's the only photo I have of the ringlight before I closed it up. ignore the tupperware in the middle(the idea behind that was to use this same flash as a beauty dish too), and it also needs the extra cardboard ring in the center that the lens goes through.
The MAIN thing you should notice is that the edges have a curve to them made w/ the foil tape, to help reflect the light out. but there is no curve on the center hole that the lens goes thru, so more light can slip by and get to the back. (hope that makes sense)
NOW Here's a closed up shot. The MAIN thing with this is to notice there is a V shape in the center hole to help send the light down the sides. i'll give dimensions later. pardon the poor pics it's 1:25am.
SidiA- Kawan Masam..Sansen Gila..
- Posts : 2719
Reputation : 18 -
Page 1 of 1
Permissions in this forum:
You cannot reply to topics in this forum|
|
|